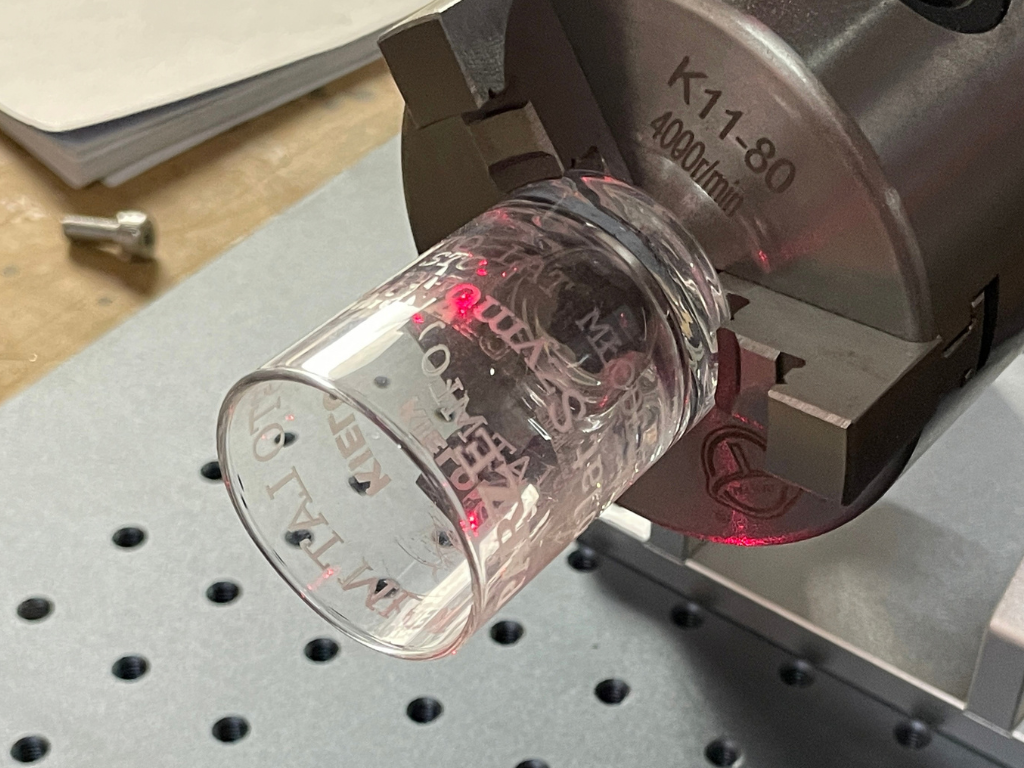
Glass is one of the few popular materials on which the laser leaves neither black nor a noticeable groove, only a matte white. This effect looks like sandblasting, but it's created and damaged differently: too much energy causes chips and cracks, too little results in a grayish, indistinct mark.
Laser engraving on glass is performed with a CO2 plotter, because glass absorbs 10.6 µm while transmitting visible light from diodes and near-infrared fibers. UV 355 nm is also absorbed, but produces a different, transparent mark—a separate technology for different applications. This text explains the physics of white, provides a step-by-step recipe using materials from two CO2 plotter manufacturers (hereinafter: A and B), and lists glass types and indicates what to avoid.
We provide these parameters as a guide and examples from the manufacturer's documentation, not as a universal table. Glass from two glassworks can behave differently with identical settings, so testing the same glass you'll use in your order is part of the process, not an option.
Where Matte White Comes From: The Physics of the Effect
A manufacturer of industrial marking machines describes it bluntly: the white mark on glass is achieved with a CO2 laser, and "the white appearance is created by creating tiny cracks in the surface of the sodium-vapour glass." The marking machine manufacturer describes the effect itself, not its mechanism. The most common explanation from practitioners is this: the glass absorbs 10.6 µm in a thin layer near the surface, which heats up faster than the glass beneath it, and the stress is released through a network of microcracks and tiny chips.
Light that passed through smoothly on smooth glass scatters in all directions on the cracked surface. This is why the sign appears white and matte, even though the glass hasn't changed color—only its topography has changed. For the same reason, white is most visible against a dark background or against the light, but can be difficult to read against a light background.
The marking machine manufacturer adds that cracks are created "gently, by repeated marking at low power"—in CO2 galvo-markers, this means several light passes instead of one strong one. In a CO2 plotter, the same goal is achieved with a single raster pass with appropriately selected energy per pixel and with a support material that absorbs excess heat. The principle is the same: microcracks yes, through-hole cracks and craters no.
Why do diodes and fibers pass through glass?
Glass is transparent to visible and near-infrared light—this is its primary utility feature. The diode (455 nm) and fiber (1064 nm) operate in this range, so the beam passes through the object instead of releasing energy into it. The marking manufacturer states that fiber "does not mark transparent objects," while CO2 is effective on "transparent materials such as glass and PET."
In practice, fiber on glass requires a layer that stops the beam. In a mirror, a laser—fiber or CO2—removes the reflective layer from the waterline side; it doesn't engrave the glass. Hence the advice to paint the glass with a black marker or LED paste. In both cases, the engraving is done on the coating, not the glass, and the effect is incomparable to CO2. If you only have fiber or LED, commission the glass; if the glass is to be a regular job, you'll need CO2 or UV.
UV 355 nm: transparent mark instead of white
The third method is ultraviolet. According to the marking manufacturer, a "transparent mark" on glass is achieved with a UV laser: 355 nm photons break the bonds directly, rather than heating the substrate. This prevents a network of micro-cracks from forming, and the mark is fine and smooth. This solution is suitable for laboratory glassware, optical components, and electronics, where stress-free performance is paramount, not decorative whiteness.
Roboteus offers this role with the RBZ 1515UV UV marking machine : a JPT 5 W (355 nm) UV source, a 150 x 150 mm working area, and a workpiece height of up to 250 mm. The manufacturer describes the process as "cold marking"—photochemical ablation without thermal damage—and lists glass, crystals, ceramics, statuettes, and electronics among its applications. The guide price on roboteus.com is from PLN 19,512.00 net (as of October 2026), configured for the process.
The selection rule is simple: the matte white on glasses, statuettes, and decorative glass is CO2; the fine, transparent, stress-free technical mark is UV. The two sources are not competing; they simply serve different purposes. The white recipe below has five steps: graphic, auxiliary material, lens and power, turntable, and cleaning.
1. Graphics: grayscale instead of solid black
The recipe starts in the file, not the machine. Manufacturer A recommends that when engraving without a support material, the solid black be replaced with approximately 70% gray—less heat goes into large, filled areas—and rasterize using the "Ordered Dithering" method. Manufacturer A prepares the photographs as a gray matrix with 70% black and engraving at 500 dpi; in another material, they specify 333 dpi as the starting value for glass.
The logic is simple: on glass, you don't want maximum energy per pixel, but rather an even, light matte finish. Large areas of black are the most susceptible to craters and cracks; thin lines and small text take longer. Also, avoid very thin lines below the beam spot, as they're no longer legible on a cracked surface.
2. Auxiliary material: wet towel, dish soap or tape
This is the most important step, and the only one on which manufacturers A and B agree in detail. Manufacturer A: A single-layer wet paper towel placed on the glass, "without air bubbles or overlaps," produces a "clean, white engraving"; any residue is wiped off after finishing. Manufacturer B: "A wet paper towel or dish soap on the surface before starting"—a damp newspaper or towel produces fewer cracks and craters and a matte appearance, while a thin layer of regular dish soap ensures a damp surface.
The wet layer does two things: it absorbs some heat and dampens spatter, making the microcracks finer and more even. Manufacturer B notes that these agents dry out—for a long job, the towel must be re-wetted and the liquid reapplied. Regular masking tape also acts as a heat-dissipating material (Manufacturer B), but Manufacturer A warns that with application tape, the engraving appears grayish, not white. If pure white is the goal, use a towel.
3. Lens, Power and Air Assist
In a project engraving a glass on a turntable, manufacturer A uses a 2.0" lens instead of a 1.5" lens "to prevent glass breakage": the longer focal length produces a larger spot and lower power density, meaning smoother matting. In the same project (a plotter with an 80W tube), the parameters are: 100% power, 60% speed, 500 ppi, and Air Assist disabled. This is an example from a specific manufacturer A machine, not a universal recipe—in other machines, the percentages mean different things, and the starting point must be determined by trial and error.
Manufacturer A doesn't justify turning off Air Assist; in practice, the airflow dries the towel and blows away the water, and there's no smoke from the cut face. Manufacturer B recommends lowering the power because "excess heat is the number one cause of glass breakage." The direction of change when trying: start with the lowest power, which produces full white, and don't go any higher; if the white is uneven, you're changing the resolution or the support material, not the power. A slight defocus can be used for the same purpose as a longer lens, but it's not used in the cited materials from manufacturers A and B—if you try it, record the result.
4. Turntable for glasses and bottles
Flat glassware is placed on the table. Manufacturer B describes anything round—glasses, mugs, bottles, stemware—unequivocally: "it will require a turntable for the CO2 machine," as the turntable stabilizes the object and ensures even engraving around its circumference. Manufacturer A adds practical details: in the software, the turntable is activated and the glass diameter is entered. For conical glasses, the inclination is adjusted so that the engraved surface is parallel to the table. For stemmed glasses, the stem is positioned so that the stem is slightly above the beam.
Before starting, check that the circumference of the glass is long enough for the graphic—manufacturer A pays attention to this when engraving around the glass. A wet towel wraps around the glass just as it would on flat glass, smoothing out bubbles and wrinkles; it dries faster on a turntable, so check it more often.
5. After engraving: cleaning and filling with paint
After removing the towel, white glass dust and paper remnants remain on the glass. These are washed off with water, and the glass particles from the cracked surface are removed with a soft brush or sponge—no hard tools that will scratch the adjacent, intact glass. The edge of the sign is slightly rough; this is normal and acts as a light scatterer.
If white is to be visible against a light background, the engraving is filled with paint: a dark or metallic paste is rubbed into the matte surface, and the excess is wiped off the smooth glass. The paint's adherence is ensured by the roughness—the paint wouldn't adhere to smooth glass. The choice of paint (for glass, or dishwasher-safe if it's a utility vessel) is the responsibility of the paint manufacturer; we don't provide figures on the filler's durability, as none of our sources contain them.
Types of glass: sodium, borosilicate, tempered, crystal
Not all glass reacts the same. The engraving machine manufacturer specifies white for soda (soda-lime) glass—the most popular for glasses, bottles, windowpanes, and inexpensive statuettes—and the formula works most reliably on it. The common denominator of risk is stress: manufacturer A warns about internal stresses in blown glass and crystal, which the heat of engraving intensifies to the point of cracking, while one laser machine vendor lists borosilicate and tempered glass as risky, without providing reasons or figures. With tempered glass, the risk includes the shattering of the entire glass, not just a localized chip.
| Type of glass | Behavior under CO2 | Source of attention |
|---|---|---|
| Soda (glasses, bottles, windows) | Even whiteness through micro-cracks; the most reliable material | marking machine manufacturer |
| Cast, cheaper | Recommended – Lower Lead Content | producer A |
| Hand-blown, crystal | Internal stresses, risk of cracking | producer A |
| Borosilicate | Less predictable, risk of cracks | machine seller |
| Hardened | Risk of the entire element breaking | machine seller |
| Quartz | Transparent mark by melting, brittle | marking machine manufacturer |
| Mirror | From the water side: fiber or CO2 removes the reflective layer, does not engrave the glass | — (practice, no manufacturer source) |
Glass Engraving – What to Avoid
The list of errors is led by one cause: excess heat.
- Too much power or too slow a feed rate —instead of micro-cracks, craters and chips form, and in thin glass, a through-hole crack. Manufacturer B: Heat is the "number one cause" of cracking.
- Multiple passes on the plotter —each subsequent pass adds heat to an already cracked, less conductive surface. If the white is too weak, improve the support material and resolution, not the number of passes.
- Dry towel or blisters underneath – where the paper does not adhere, the engraving is grey and uneven (manufacturer A: "no blisters or overlaps").
- Air Assist on – dries the support material during the job.
- Large areas of complete black – the most heat per unit area; manufacturer A converts them to about 70% gray.
- Sharp, thin pattern elements and microtext – on a cracked surface they lose legibility; it is worth simplifying the edges of the pattern slightly.
- Untested crystal, tempered or unknown glass – manufacturer B: power and speed test on the same type of glass before each task.
- Engraving without exhaust and without glasses with the machine open – glass dust and 10.6 µm radiation require an enclosure or protective measures; a plotter in a closed enclosure with a cover lock may be classified as a Class 1 device (or 2 due to the index – according to the manufacturer A), the class is determined by the manufacturer, and without an enclosure or with a bypass lock it is Class 4.
Applications and machine selection
Matte white is primarily used in the decorative and advertising markets: statuettes and awards, event glasses, mugs and glasses, personalized bottles, decorative glass and panels, and glass plaques. Industrially, white is used less frequently on glass—where stress-free performance is essential (laboratory glassware, ampoules, optics), UV comes into play.
For white, you need a CO2 plotter with a job-sized table and a turntable. The RBL 9060 CO2 laser plotter has a 900 × 600 mm field, an EFR 80 W glass tube, a 2.5″ lens, a honeycomb table, a CW5200 chiller, and a Ruida controller; the manufacturer lists engraving on wood, glass, and stone among its applications. A longer lens—in this case, 2.5″—follows the manufacturer's recommendation for glass: a larger spot, gentler matting. The RBL 9060's guide price on roboteus.com is from PLN 15,854.00 net (as of October 2026), configured for the process. Larger formats (RBL 1390, RBL 1610) make sense for glass and panels; you'll find the full range in CO2 laser plotters .
We've covered what else the same machine can—and can't—do in the article about what a CO2 plotter is suitable for . If you're marking plastics in addition to glass, also read about choosing the right wavelength for plastics —there UV has more to say than on glass. If you handle several glass jobs per year, consider the threshold in the article about whether to commission laser engraving or buy a machine .
Frequently asked questions
What laser should I use to engrave glass?
A CO2 plotter (10.6 µm) is used because glass absorbs this wavelength and becomes dull due to surface microcracks. UV 355 nm produces a transparent, fine mark without stress—it's the perfect choice for laboratory and technical glassware. The diode and fiber pass through glass and, without an auxiliary coating, don't produce a usable result.
Does a diode laser engrave glass?
Not directly. Glass is transparent at 455 nm, so the beam passes through it instead of emitting energy into the surface. The advice about painting glass with a marker or paste is for engraving this coating, and the effect doesn't compare to the whiteness of CO2.
Why is the engraving on the glass white?
According to the marking manufacturer, CO2 creates a network of tiny cracks on the surface of the soda-lime glass. Light that is transmitted through the smooth glass scatters in all directions on the cracked surface, leaving the mark appearing white and opaque. The glass didn't change color, but its surface structure did.
Is laser engraving on tempered glass safe?
It's risky. Tempered glass carries intentionally introduced stresses, and localized heating can release them throughout the entire piece—machine sellers warn against this, and plotter manufacturers similarly warn against blown glass and crystal with internal stresses. If you must, test on an identical piece and expect loss.
How to engrave glass without cracks or chips?
A wet, single-ply paper towel without bubbles or a thin layer of dish soap (recommended by two CO2 plotter manufacturers), Air Assist turned off, a longer lens, graphics with about 70% gray instead of full black, and the lowest power setting that produces full white. Before ordering, test on the same glass—one of these manufacturers considers this a mandatory step.
How much does glass engraving cost at an engraver?
In the engraving price lists (net, as of October 2026), GMgraw charges 3.0 PLN per minute for CO2 engraving on glass, and 5.0 PLN per minute for engraving with a rotary attachment. Laserotechnika charges 50% of the table price per unit for "round" engraving. The calculation of the threshold at which a custom machine is cheaper than outsourcing is included in the text about the service and the custom engraving.
Sources
- https://gmgraw.pl/cennik-uslug/ — price list of services: glass per minute, rotary attachment; as of October 2026
- https://laserotechnika.pl/index.php?id_cms=8&controller=cms — surcharge for round engraving; as of October 2026
- https://www.ciop.pl/CIOPPortalWAR/file/99433/Ochrona_przed_promieniowaniem_laserowym_MatInf_M.Okrasa_I.PN.06.pdf
- https://roboteus.com/pl/maszyny/plotery-laserowe-co2/ploter-laserowy-co2-rbl-9060/
- https://roboteus.com/pl/maszyny/znakowarki-laserowe/rbz1515uv/
Editorial note
The parameters in the manufacturer's documentation A and B apply to specific machines from these manufacturers and are intended as a starting point, not as a definitive formula. The results vary depending on the machine, lens, glass type, and batch. Guide prices for Roboteus machines, engraving shop price lists, and retailer list prices are subject to change; the amounts provided are as of October 2026. This text does not replace the manufacturer's instructions or occupational health and safety regulations regarding lasers, exhaust ventilation, and eye protection.